
|
| Automate SharePoint List Actions with Cloudmersive Connectors |
| 8/14/2024 - Brian O'Neill |
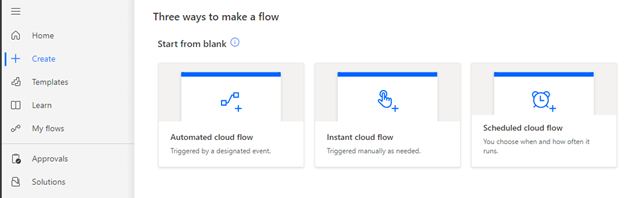
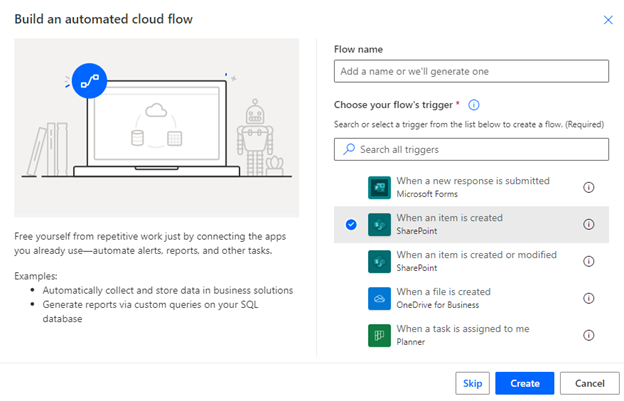
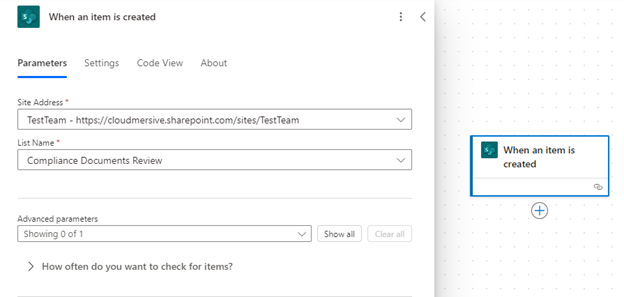
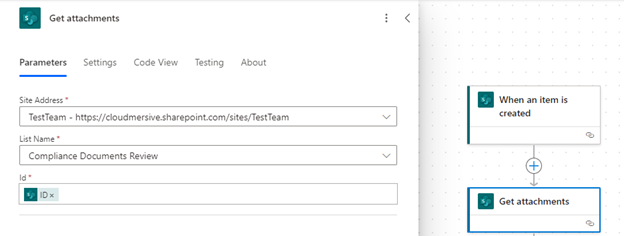
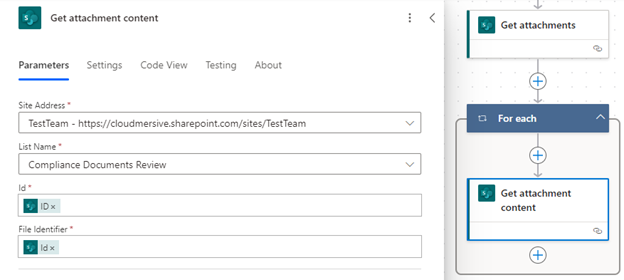
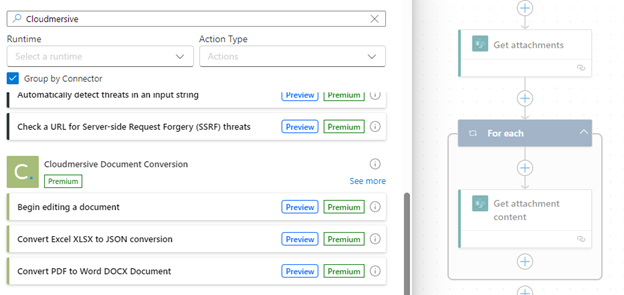
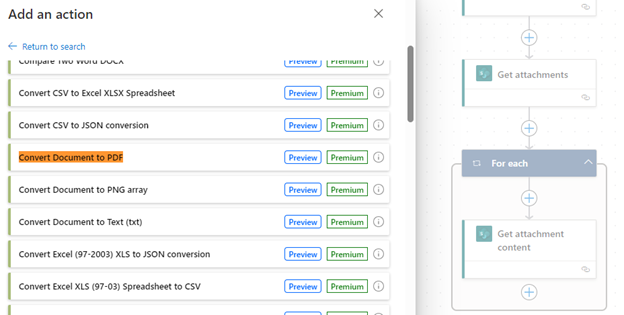
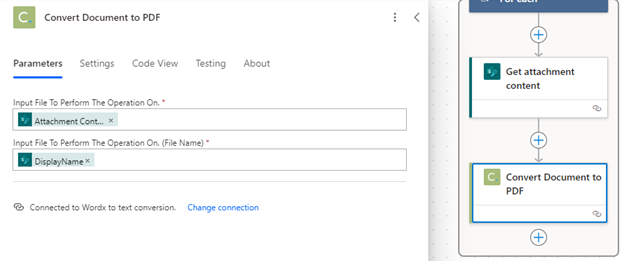
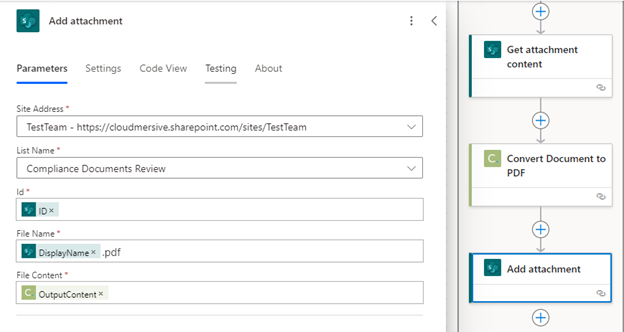
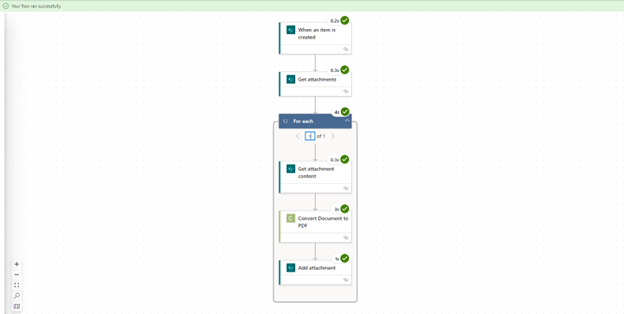
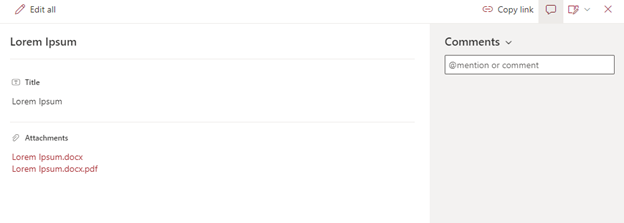
SharePoint List AutomationSharePoint Lists are an increasingly popular digital collaboration feature available in the Microsoft ecosystem. Lists can be exhaustively customized for anything from issue and expense tracking to company-wide surveys and announcements, and the addition of new list features - such as the recent incorporation of form entry URLs for SharePoint lists, for example - is constantly expanding that functionality. Thanks to Power Automate, the functionality of SharePoint Lists can be supported and expanded even further – all without writing a line of code. With Power Automate’s extensive suite of built-in Microsoft ecosystem connectors, we can trigger all kinds of value-add workflows when actions are taken in our SharePoint Lists. One common example of this is triggering the Office 365 Outlook connector to automatically email list attachments or new work assignments to list members; another is setting up automated stakeholder approval workflows via the Approvals connector. Enhanced Automation with Cloudmersive APIsUsing Cloudmersive APIs as connectors in Power Automate, we can advance the capabilities of our lists even further. We can automatically validate, convert, and analyze the contents of documents attached to our SharePoint lists, and we can even implement advanced virus and malware scans before files are distributed to sensitive locations inside and outside of our network. As always, flexibility is the name of the game with Cloudmersive APIs: we can use Cloudmersive APIs as built-in Power Automate connectors to make low-scale public cloud endpoint calls, or we can create custom connectors that leverage our own Private and Managed Instance endpoints for hyper scalability and enhanced data security. SharePoint List Automation with Cloudmersive: Blog SeriesIn our SharePoint List Automation blog series, we’ll walk through some value-add Power Automate flows that leverage Cloudmersive APIs to improve SharePoint List capabilities. This week, we’ll start with a flow that automatically converts all SharePoint List Item attachments to PDF and attaches the new document(s) back to the original list item. If you'd prefer to watch a video version of this walkthrough, please follow this link. Convert SharePoint List Item Attachments to PDF using the Cloudmersive Convert APIThe Cloudmersive Convert API offers several unique actions for handling PDF conversions. As mentioned earlier, we can access those actions in Power Automate through an already-published connector that makes calls to a public cloud endpoint, or through a custom connector that makes calls to our Enterprise plan’s custom deployed endpoint. If we’re having trouble deciding which option is best for us, we can contact a sales representative and discuss the scope of our project with them. The specific Convert API iteration we’ll want to use in this case is the Convert Document to PDF API. There are several Convert API iterations designed to handle specific format conversions to PDF (e.g., DOCX to PDF or XLSX to PDF), but the Convert Document to PDF API is designed to autodetect a wide range of unique input file types and make high-fidelity conversions without any additional intervention. Using this broadly scoped API with our SharePoint List makes a lot of sense; we’ll be able to automatically convert anything from spreadsheets to written documents, images, and presentations without implementing extra steps to distinguish specific file types. 1: Selecting the Right Type of FlowOur goal is to design a flow that automatically triggers when new items are added to a target SharePoint List. That means we should start by creating an Automated cloud flow. Automated flows trigger when a designated event occurs, and in this case the event will be the addition of a new item to a specific list. 2: Selecting the Right TriggerBefore we head to the flow diagram page, we’ll want to pick a trigger action that describes our list event. In this case, we’ll select the SharePoint When an item is created trigger. We could also use the When an item is created or modified trigger for this flow to account for scenarios where new files are attached to existing list items. If we go that route, however, we’ll need to implement various controls in our flow to prevent an infinite loop (i.e., a flow that re-triggers itself by attaching the converted PDF back to the original list item). Step 3: Configure the SharePoint Site Address and List NameIf we haven’t yet configured our SharePoint connection in Power Automate, now’s the time to do it. For our initial When an item is created trigger action – and for every SharePoint action we use subsequently in this flow – we’ll need to select the SharePoint Site Address and SharePoint List name associated with the list we’re creating the flow for. We can see those selections below (we won’t cover this part again in our walkthrough). Step 4: Get Attachments and Attachment ContentThe next two actions we’ll use in our flow will 1) retrieve the attachment information from our list item and 2) retrieve the attachment file bytes. We can find both actions in the SharePoint connector actions list; the first is labeled Get attachments, and the second is labeled Get attachment content. In our Get attachments action, we’ll satisfy the Id field using the list item ID from our trigger action. In our Get attachment content action, we’ll once again use the list item ID from our trigger action, and we’ll then add the File identifier value (expressed as Id) retrieved by our prior Get attachments action. We’ll notice that selecting the Id value automatically wraps our Get attachment content action in a For each (also known as Apply to each) control. Power Automate does this automatically to account for the possibility that multiple files are attached to a single list item. Step 5: Convert Attachment Content to PDFWe’ll now incorporate our Cloudmersive Convert API action to convert our list item attachment contents to PDF. In the context of this walkthrough, we'll look for this action on the published Cloudmersive Document Conversion connector actions list; remember, however, that we could also use this action with a custom endpoint by uploading the Convert API to Power Automate as a custom connector. To reach the Cloudmersive Document Conversion connector actions list, we’ll add a new action within our For Each control, then type "Cloudmersive" into the connector search bar, and finally click See more next to the Cloudmersive Document Conversion connector with the green logo. From here, we’ll search for an action called Convert Document to PDF, and we’ll select it once we find it. If we haven’t used this connector before, we’ll need to name our connection and provide an API key to configure our connection. To take care of this, we can simply copy and paste an API key from our Cloudmersive account portal, and we can then name our connection whatever we would like. If we don't yet have a Cloudmersive account, we can easily sign up for a free account to get started. Free accounts provide a free API key which allows a limit of 800 API calls per month (resetting each month in perpetuity) with zero additional commitments. To configure our request variables, we’ll use Attachment Content retrieved in the previous action, and we’ll enter the DisplayName value from our Get attachments step (note that the name we use doesn’t actually matter). Step 6: Attach the PDF to the SharePoint List ItemIn the final step of our flow, we’ll use the SharePoint Add attachment action to attach our new PDF document to the same list item we retrieved the original content from. After we name our file, we will use OutputContent from our PDF conversion step to define the contents of our new list item attachment. We will also use the original list item ID to define our attachment location once again. Step 7: Test the FlowTo test our flow, we will click save and then test in the upper right-hand corner of the page. We will then select the option to trigger our flow Manually and click Test once again. This will prompt us to test our flow by performing the starting action, which means creating a new list item with a file attachment. The Convert Document to PDF action supports all major Office formats, HTML, and more than 100 unique image formats. When our flow finishes running, we will find a PDF version of our original document attached to the same list item. And that’s all there is to it! If you have any questions about designing flows with Cloudmersive APIs in Power Automate, please feel free to contact a member of our team. |
Sign Up Now or 

 Blog
Blog

 Virus Scan APIs
 Content Disarm and Reconstruction APIs
 Spam Detection APIs
 Document Conversion & Processing APIs
 Document AI APIs
 Natural Language Processing (NLP) APIs
 Optical Character Recognition (OCR) APIs
 Image and Face Recognition and Processing APIs