
|
| Automatically Watermark PDFs Attached to a SharePoint List in Power Automate |
| 8/20/2024 - Brian O'Neill |
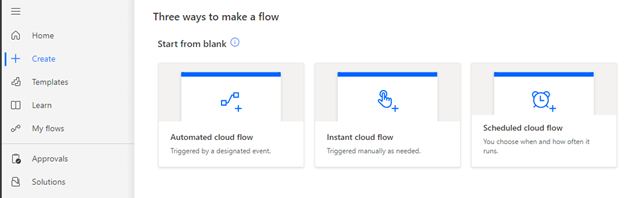
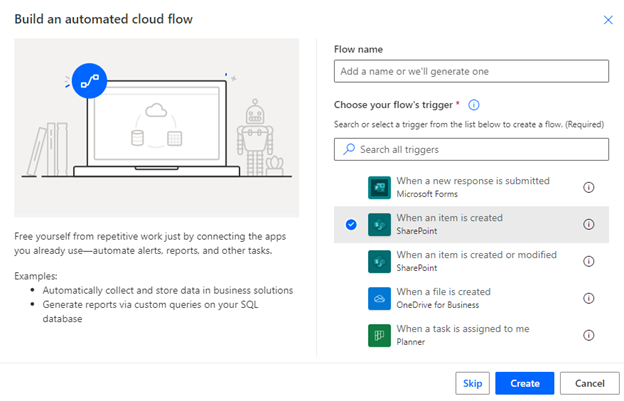
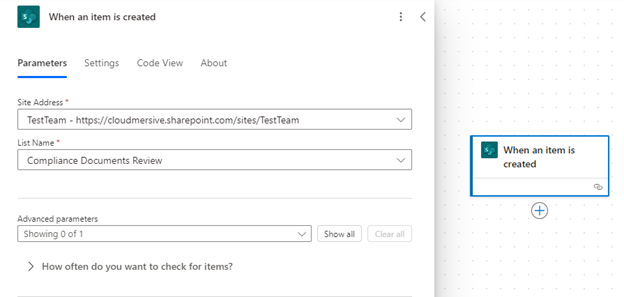
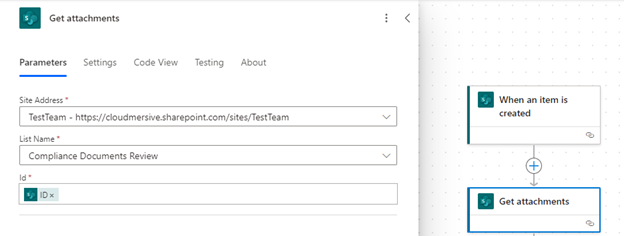
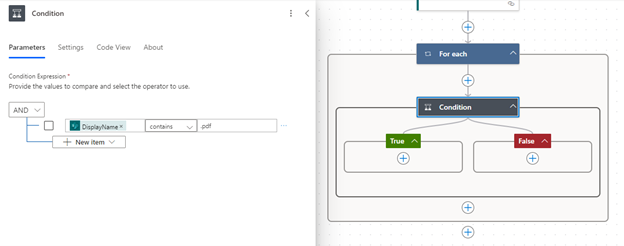
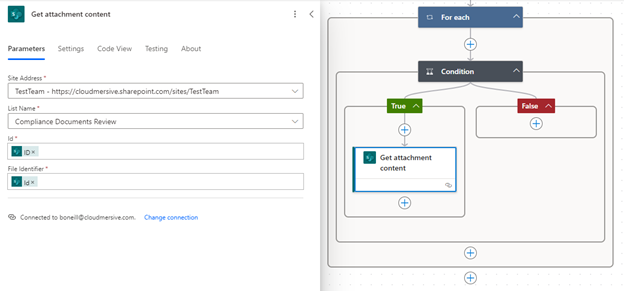
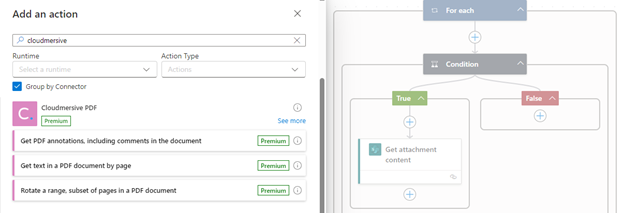
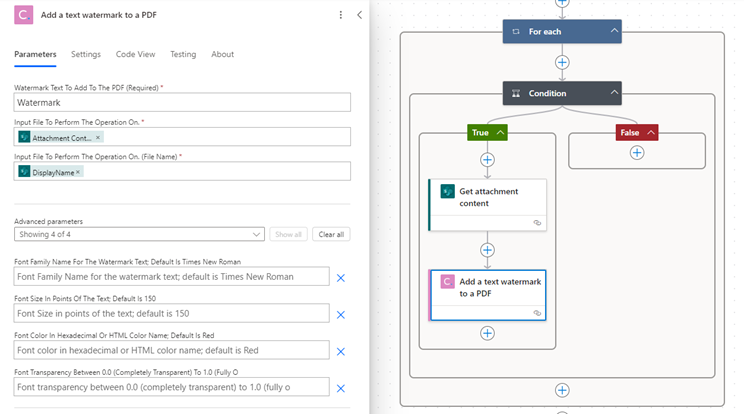
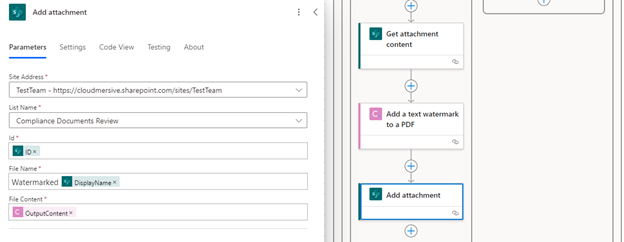
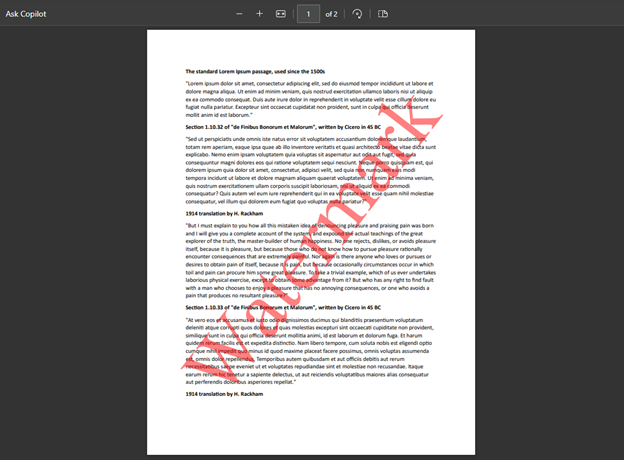
We’re back again this week with another Power Automate walkthrough! This week, we’re going to leverage yet another Cloudmersive Convert API action in a SharePoint List automation scenario. Specifically, we’re going to learn how to automatically apply our own custom text watermarks to PDF documents when they’re attached to a target SharePoint List. If watermarking is an essential part of our team’s document compliance workflow, this simple automation might save us a ton of time and effort in the long run. If you'd prefer to watch a video version of this walkthrough, please follow this link. What is a Watermark?Watermarks are obstructive labels that protect content from unauthorized use, copying, or distribution. They’re typically semi-transparent text, logos, or patterns overlaid on a document, and they’re commonly used across a wide range of industries. In Financial Services, for example, watermarks are frequently applied to PDFs (and other documents) to indicate the degree of confidentiality associated with any given document and eliminate any uncertainty around who’s privileged to view that content. Government agencies also lean on watermarks to ensure document authenticity and create clear trails for audits and other compliance checks. Watermarking with the Cloudmersive Convert APIThe iteration of the Convert API we’ll use today is appropriately labeled Add a text watermark to a PDF. This API allows us to customize the font name, size, color, and transparency of our PDF text watermark. To be clear, this API is ONLY for creating text watermarks. Before we get to our walkthrough, we’ll first discuss our options for using this API in Power Automate. As a quick reminder, we can take advantage of Cloudmersive Convert API actions in Power Automate in two different ways: we can either use published Cloudmersive connectors - such as the Document Conversion connector, File Processing connector and PDF connector - or we can upload the Convert API to Power Automate as a custom connector. If we’re a current enterprise customer leveraging Cloudmersive APIs with a private or managed instance endpoint, using a custom connector route will give us the flexibility to make API calls through Power Automate against our own endpoint (if you have any questions about configuring this correctly, please feel free to contact your sales representative). If we’re new to using Cloudmersive connectors, we can easily leverage the published suite of Cloudmersive connectors with a public cloud connection by creating a free account (on the Cloudmersive website) and getting a free API key. Free API keys allow a limit of 800 API calls per month with zero commitments; that total resets each month in perpetuity, and if 800 API calls gets the job done, we’ll never have to scale up. Step 1: Create an Automated Cloud FlowIn this walkthrough, we’re creating a flow that triggers when new items with PDF attachments are added to a specific SharePoint list. That means we’ll start by selecting the Automated cloud flow option. From here, we’ll search for and select the SharePoint When an item is created trigger action. This action kicks into gear when new brand-new items are added to a SharePoint List. As a reminder, we could also use the When an item is created or modified trigger action if we’re interested in watermarking PDFs attached to existing list items, but it’s important to remember that using this action can result in infinite loops if we don’t structure our flow properly. Step 2: Configuring Initial SharePoint ActionsWe’ll kick off designing our flow by opening our trigger action, configuring our SharePoint connection with our account details, and selecting our Site Address and List name from each respective dropdown. We’ll need to select the same Site Address and List Name in each subsequent SharePoint action we implement in our flow. That includes the next action we’ll incorporate, which is the SharePoint Get attachments action. This action uses the ID (List item ID) value from our trigger action to retrieve an array of information about each file attached to our target list item. We’ll eventually use that information to get the attachment content. Step 3: Limit File Type to PDFSince the API we’re building this flow around only works on PDF documents, we’ll need to implement a basic Control to limit our file selection to PDF. Otherwise, our flow runs might fail more than we’d like and inundate us with error messages. We’ll take care of this by implementing a basic Condition. We’ll configure our condition to make sure the DisplayName value (retrieved by the Get attachments action) contains the string “.pdf”. We’ll notice that selecting the DisplayName value causes Power Automate to automatically wrap our Condition in a For each (also referred to as Apply to each) control. This is to account for the fact that multiple unique files might be attached to the same list item. Step 4: Get File Content for Each AttachmentWithin the True branch of our Condition, we’ll now add in our SharePoint Get attachment content action. We’ll use the original list item ID from our trigger action and the File Identifier Id from our Get attachments action to retrieve content from each list item attachment. Step 5: Create a Custom WatermarkNow that we’ve brought PDF attachment content into our flow, we can finally implement our custom watermarking action via the Cloudmersive Convert API. For the purposes of this walkthrough, we’ll look for this action in a published Cloudmersive connector and make our calls against a public cloud endpoint; as a reminder, however, we can also use a custom Convert API connector to set our own private or managed instance endpoint. We’ll find the Convert API action we’re looking for in the Cloudmersive PDF connector. To bring up the list of published Cloudmersive connectors and find the Cloudmersive PDF connector, we just need to add a new action and type “Cloudmersive” into the search bar. When we click See more next to the Cloudmersive PDF connector, we’ll find the action we’re looking for - Add a text watermark to a PDF - atop the alphabetically organized list. Once we select the Add a text watermark to a PDF action, we’ll need to configure our Cloudmersive connection with our API key if we haven’t already. After that, we can use the Attachment Content value from our Get attachment content action to provide PDF file bytes for the operation, and we can use the DisplayName value to satisfy the file name variable. Next, we’ll enter our watermark text string into the variable labeled Watermark Text To Add To The PDF. We can then click Show all to view the advanced parameters, and from here we can customize the font family, size, color, and transparency of our watermark. If we leave all these values empty, we’ll end up with a size 150, red, Times New Roman watermark at 0.5 transparency. If we’re comfortable with default values, we don’t have to enter any information here. Towards the end of this article, we’ll see what that exact watermark looks like on an example PDF. Step 6: Attach the Watermarked PDF to the Original SharePoint List ItemNow that we’ve completed our custom watermarking step, we can add one final action into our flow that attaches the new watermarked PDF to the original list item. We’ll use the SharePoint Add attachment action for this purpose. We’ll specify the original list item by once again supplying the list item ID, and we’ll satisfy the File Content variable using OutputContent from our watermarking action. We can name our file using any naming convention that makes sense to use; in this example, we will simply type “Watermarked” next to the original attachment DisplayName to easily distinguish our modified PDF content from the original document. Step 7: Test the Flow and Generate a Watermarked PDFWe’ll now click Save in the upper right corner of the page, and once our flow successfully saves, we’ll click Test directly after. We’ll then select the option to trigger our flow Manually, and we’ll click Test once again. Power Automate will now wait for our flow’s trigger action to occur, which means we’ll need to attach a new PDF document to the target SharePoint List. When our flow finishes running, we’ll find the watermarked version of our PDF attached to the original list item (note that we may have to refresh our SharePoint List page for the new PDF to populate). We can now open our watermarked document and review the output of our operation. If we used the default API settings and entered a text string of similar length to “Watermark”, our result should look similar to the below example: ConclusionAnd that’s all there is to it - we've reached the end of our walkthrough! We can now easily add custom watermarks to PDFs automatically when they're attached to a relevant SharePoint List. If you have any questions about automating SharePoint List actions with Cloudmersive APIs, please feel free to reach out to a member of our team. |
Sign Up Now or 

 Blog
Blog


 Virus Scan APIs
 Content Disarm and Reconstruction APIs
 Spam Detection APIs
 Document Conversion & Processing APIs
 Document AI APIs
 Natural Language Processing (NLP) APIs
 Optical Character Recognition (OCR) APIs
 Image and Face Recognition and Processing APIs