Calling all Cloudmersive Private Cloud customers!
We have exciting news: you can now deploy your Private Cloud instance on Azure App Service with Containers.
This means you can now take advantage of automated scaling, high availability, security, and maintenance - all while retaining full control over the private deployment environment.
If you’re wondering how to deploy your instance, you’re in luck! We’re going to cover the end-to-end deployment process in this post. By the end, you’ll know exactly what to do – and what bumps you might run into along the way.
Getting Started
First things first, we’re going to log into our Cloudmersive Management Portal and navigate to our Private Cloud tab.
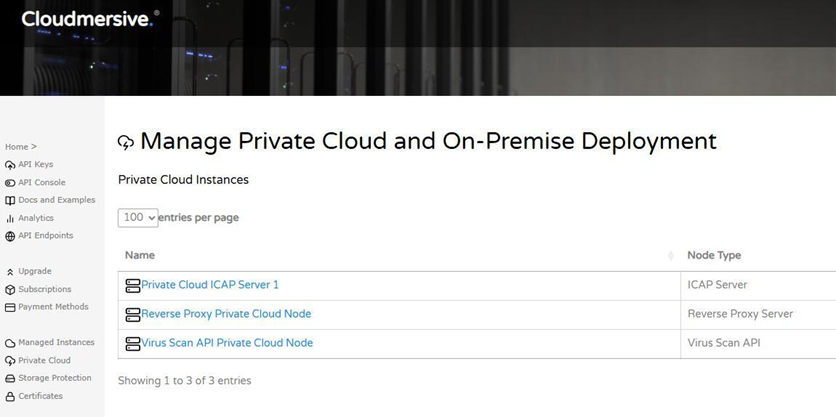
From here, we’re going to select the node we’d like to deploy on an Azure App Service. In this walkthrough, we’ll select a Virus Scan API node.
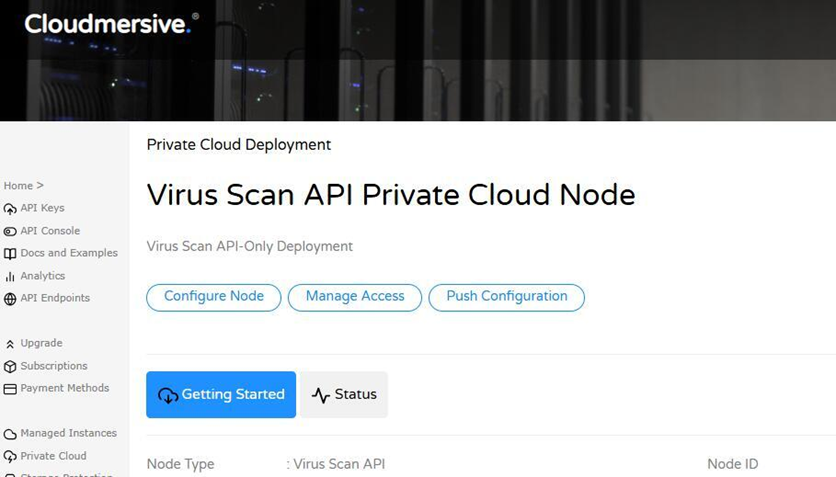
On our node page (below the node information), we’ll find installation instructions available for a number of different Operating Systems. We’ll click on the Azure App Service option.

This will populate the bottom of the page with instructions to complete our installation. Everything we need to know to complete our installation is included on this page, but we’ll go over each step in some more detail below.
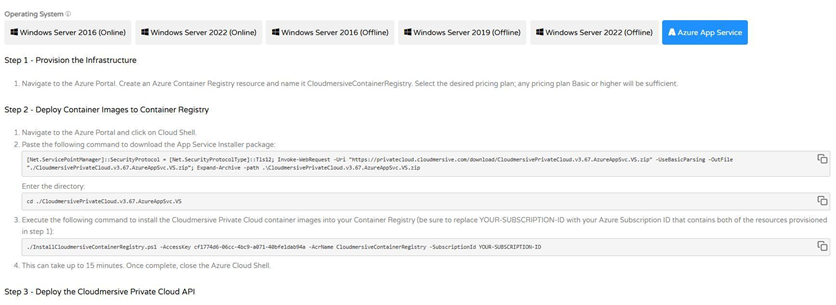
Step 1: Provisioning the Infrastructure
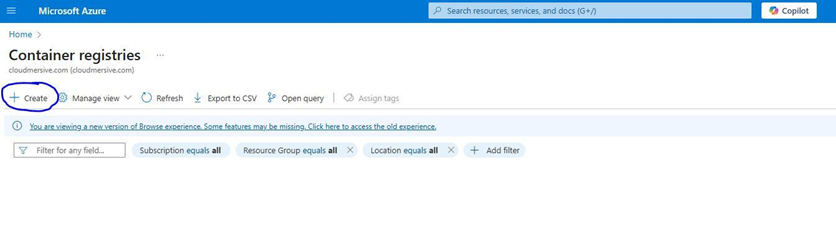
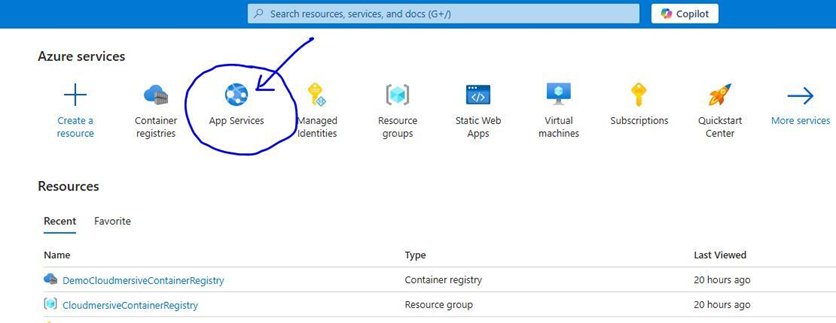
In the first step of our installation, we’ll head over to the Azure Portal and create an Azure Container Registry resource.
Creating our Container Registry
To do so, we’ll need to find and select the Container registries service. If this isn’t immediately showing up on our home page, we can either search for it using the search bar at the top of our page or click “More Services”.
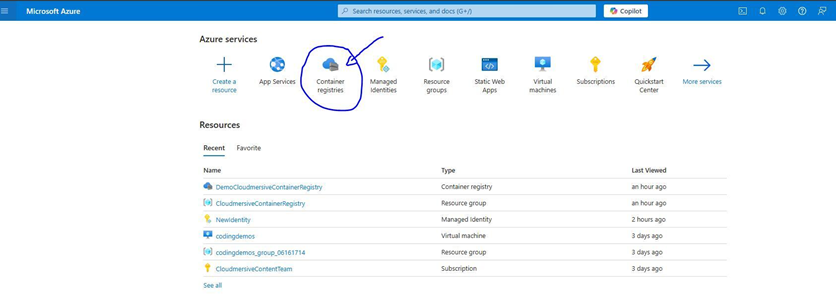
From there, we’ll select the option to create a new registry.
Naming our Container Registry
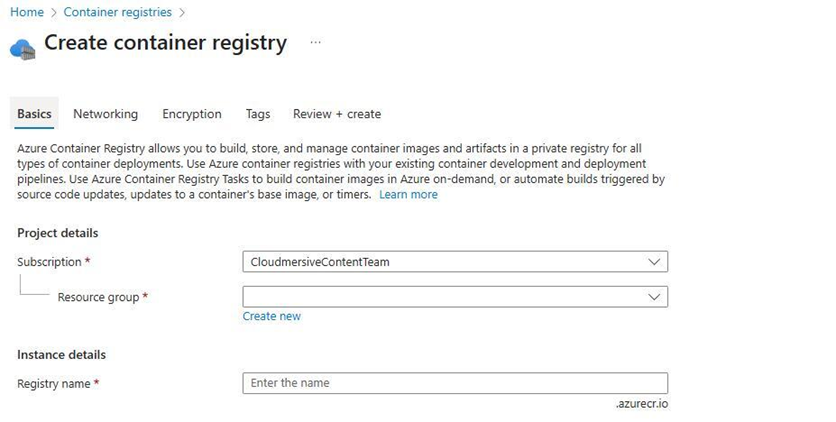
On our Create container registry page, we’ll start by giving our registry a relevant Name.
Note that on the Azure App Service installation instructions in our Cloudmersive Management Portal, it says to name our registry resource “CloudmersiveContainerRegistry”. Azure may point out that this registry is already in use, as seen in the below screengrab:
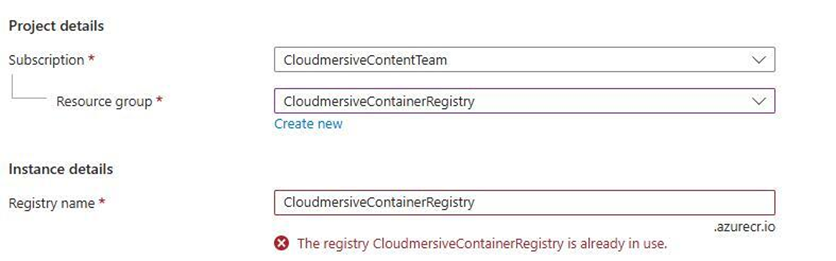
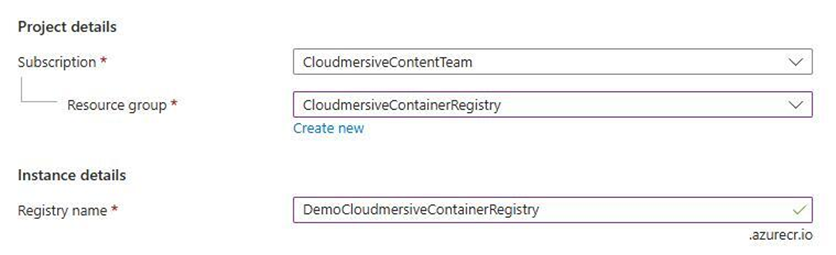
If that’s the case, we can get around the problem by creating our own unique variation of the name. In this example, we’ll name our registry “DemoCloudmersiveContainerRegistry”.
Picking our Registry Location
We’ll then select a Location to register our container in. This can be any location we want – but we’ll want to make sure early on that our Azure subscription supports this same location in App Services. If our eventual App Service deployment location doesn’t match our container registry location, we won’t be able to deploy our service successfully.
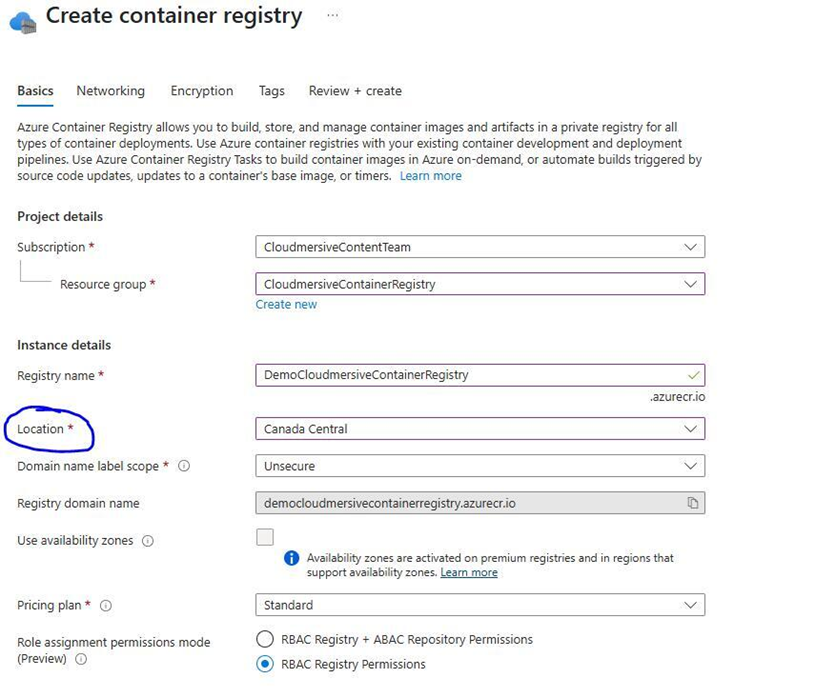
Selecting a Pricing Plan
Finally, we’ll select whichever Pricing plan we want from the dropdown (Basic, Standard and Premium are all fine), and we’ll then click Review + create.
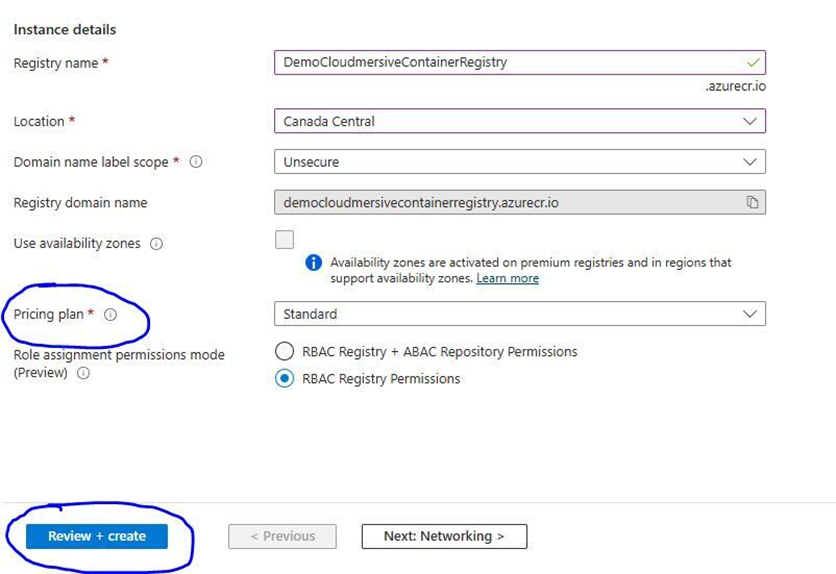
When our container registry passes its validation check, we’ll click Create to wrap up Step 1.

Step 2: Deploying Container Images to Container Registry
Now that we’ve created our container registry, we’ll deploy images to that registry.
Opening up the Cloud Shell CLI
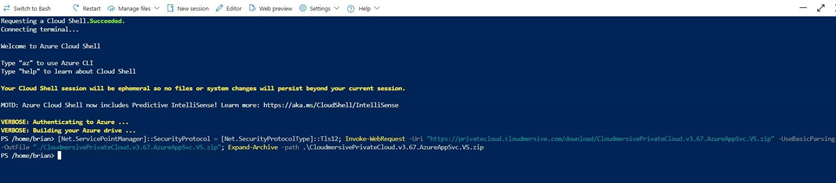
We’ll deploy images using Azure’s Cloud Shell command line interface (CLI).
To access Cloud Shell, we’ll click on the Cloud Shell icon at the top of our Azure Portal bar.
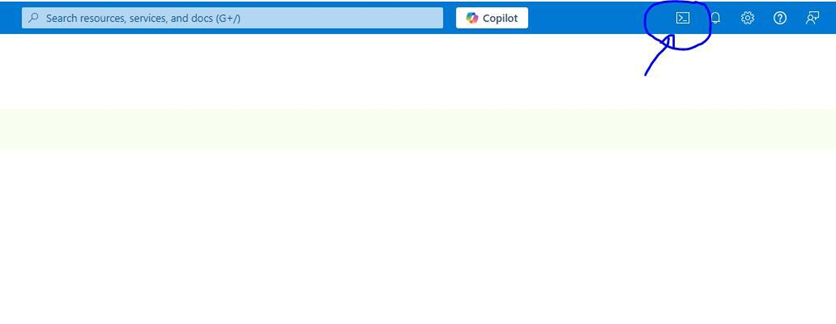
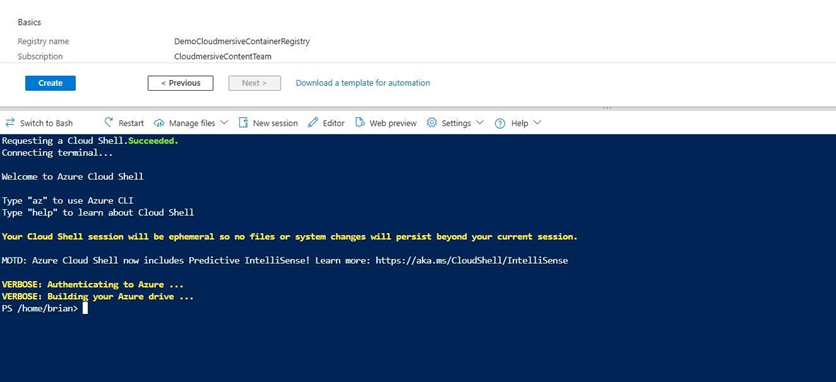
This will open the Cloud Shell CLI in the bottom half of our Azure Portal.
Running Installation Commands
We’ll now run a series of commands in Cloud Shell to download the App Service installer package, enter the correct directory, and install Cloudmersive Private Cloud container images into our container registry.
We’ll find each of the commands we need in Step 2 of our Azure App Service installation instructions on our Private Cloud Node page in the Cloudmersive Management Portal.
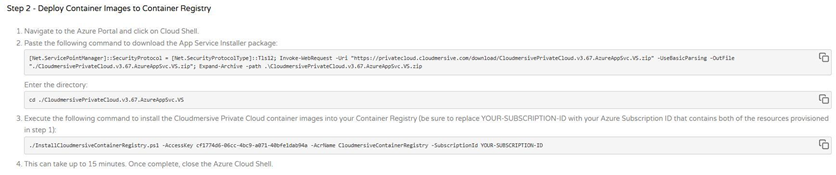
We’ll begin by copying our App Service Installer package and pasting it in the Cloud Shell CLI. We’ll then run the command.
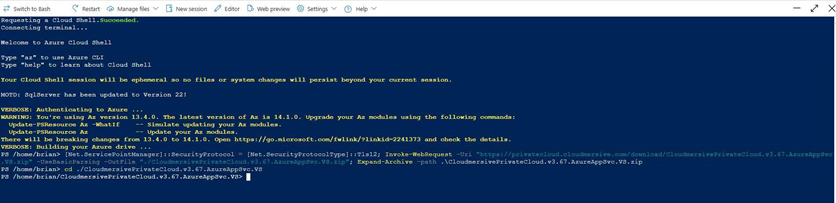
Next, we’ll copy the directory command and paste it in the Cloud Shell CLI, and we’ll run this command to enter the correct directory.
Finally, we’ll get ready to execute our Cloudmersive Private Cloud container image installation command. First, however, we’ll want to modify a few of the default details in this command. We can do that directly in the CLI, but it might be easier to paste the command in a blank text (.txt) file and edit from there. Note that we won’t be sharing screengrabs of this process here due to the sensitive information involved.
We’ll first remove the default -AcrName “CloudmersiveContainerRegistry” and replace that with the name we gave our own container registry. Next, we’ll replace the -SubscriptionId “YOUR-SUBSCRIPTION-ID” placeholder text with our own Azure subscription ID value. We can find this value on the Overview tab of any active Azure resource, including the container registry we just created.
Initiating Installation
After we copy and paste our modified command in the Cloud Shell CLI, we should receive a welcome message for Cloudmersive Private Cloud’s Azure App Service Installer.

After we type “Yes” to agree with terms of service, installation will begin. It might take up to 15 minutes.

When installation is complete, we’ll see the “Installer finished” notification in the Cloud Shell CLI. At this point, we can close out Cloud Shell.

Step 3: Deploying the Cloudmersive Private Cloud API
With our container registry created and our **Cloudmersive Private Cloud images installed, we’ll now complete the third and final phase of installation – deploying the Cloudmersive Private Cloud API in a new Azure Web App.
Creating our Web App
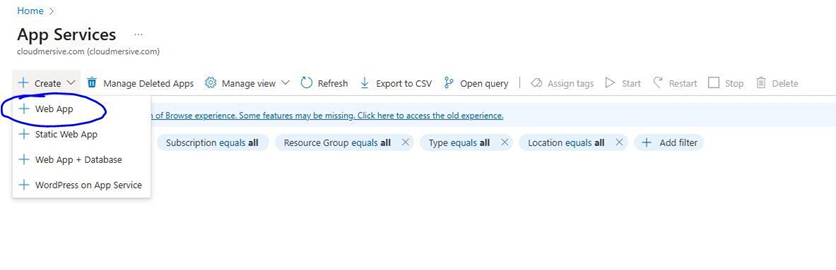
We’ll start by navigating to Azure App Services from our Azure Portal home page.
We’ll next click “Create”, and from there, we’ll select the option to create a Web App.
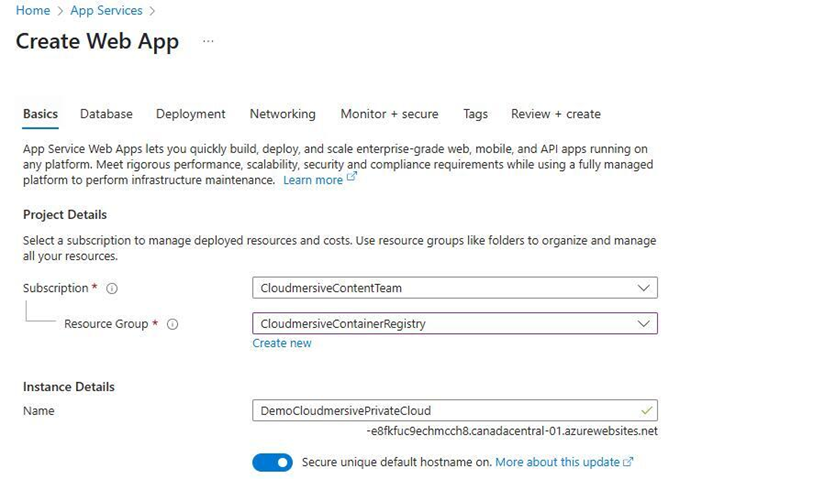
Naming our Web App
We'll now create a unique name for our application with “CloudmersivePrivateCloud” in it. In this example, we’ll call our application “DemoCloudmersivePrivateCloud”, and we’ll save it in the same resource group as our container registry.
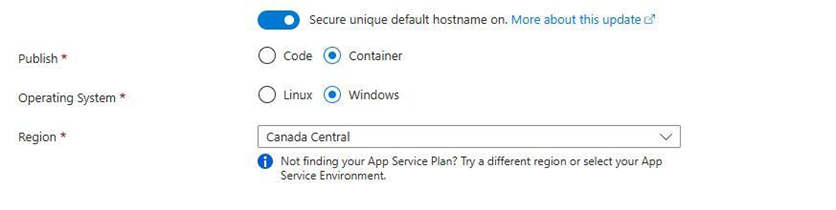
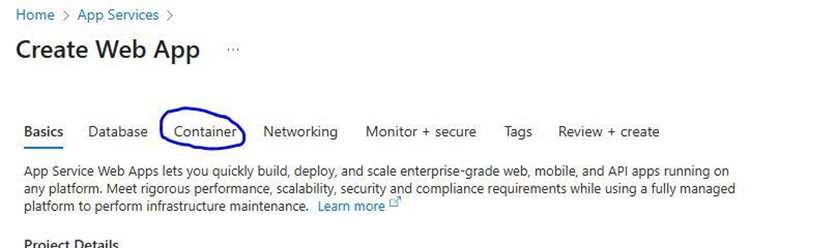
Publishing to a Container
Now we’ll select “Container” under publish, and we’ll choose “Windows” as our operating system. When we select our region, we’ll need to make sure it’s the same region we selected when we created our container registry.
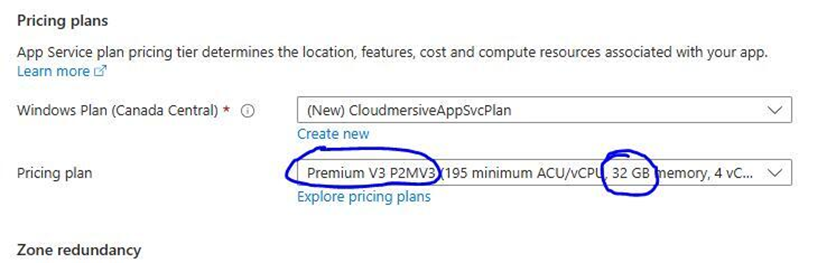
Creating and Selecting our Pricing Plan
After that, we’ll create a new pricing plan. First, next to Windows plan, we’ll click Create new and we’ll name our pricing plan “CloudmersiveAppSvcPlan”.
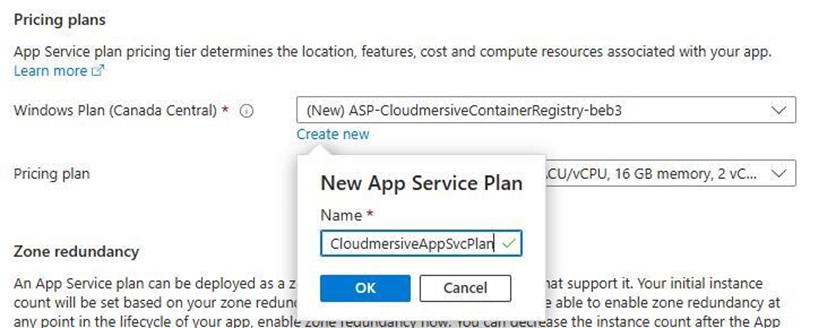
Then, next to pricing plan, we’ll make our pricing plan selection. We’ll need a minimum of 32 GB RAM (Premium v3 P2mv3 or higher is recommended). In this example installation, we’ve selected the recommended plan.
Selecting our Container and Managed Identity
Now we’ll navigate to the Container tab at the top of our page.
Next to image source, we’ll check the “Azure Container Registry” box.
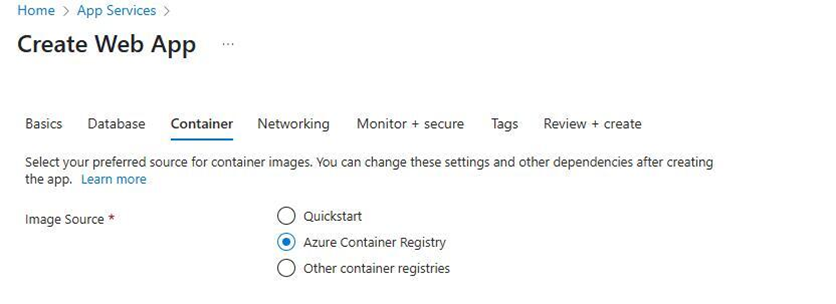
The container registry we created earlier should be automatically selected after we do this – but if not, we can select our container registry from the registry dropdown.
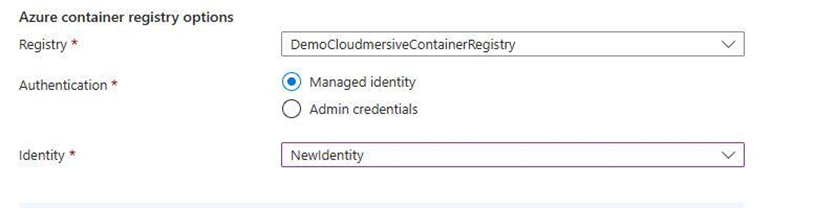
Next to authentication, we’ll select the “Managed identity” option, and next to Identity, we’ll select a managed identity associated with our Azure subscription. Note that if we do NOT have a managed identity yet, we will need to create one and assign it the Acrpull role for our container registry – otherwise we won’t be able to use an Azure Container Registry as our image source. This can be done by the owner/administrator of our Azure subscription.
Now we’ll configure our image and tag fields.
In our Image field, we’ll enter the string cloudmersive-privatecloud. In our tag field, we’ll enter the string win2022_win_virusscanapi.
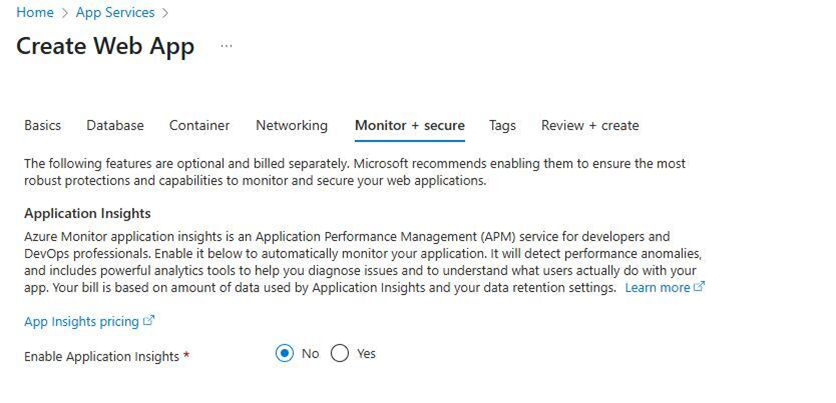
Disabling Application Insights
Next, we’ll navigate to the Monitor + secure tab at the top of our page.
Here, we’ll need to make sure enable application insights is set to “No”. This is important – leaving application insights on will break Cloudmersive Private Cloud API functionality.
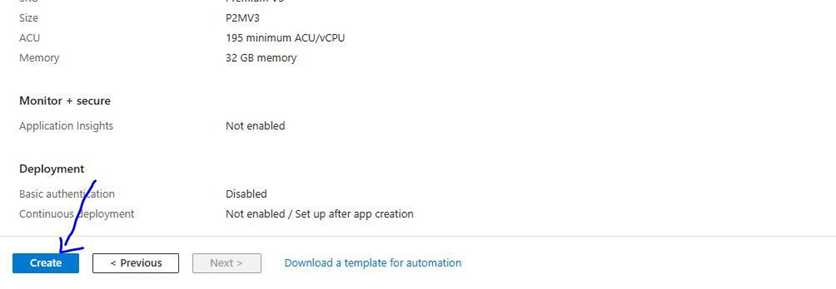
Initiating our Web App Deployment
We’ll now click Review + create at the bottom of the page, and we’ll click create on the Review + create page to begin deploying our app.
Note that it’s possible our app deployment fails if no instances are available to satisfy the request immediately. If that occurs, Azure will give us an error message letting us know that App Service is “attempting to increase capacity”, and that we should “retry our request later”.

This typically occurs when the Azure region we’re trying to deploy to is experiencing high demand and doesn’t have enough compute capacity available to provision new instances. We may need to retry later, or we may need to pick a new region to deploy in. Note that if we choose to select a new region, we’ll need to create a new container registry with the matching region.
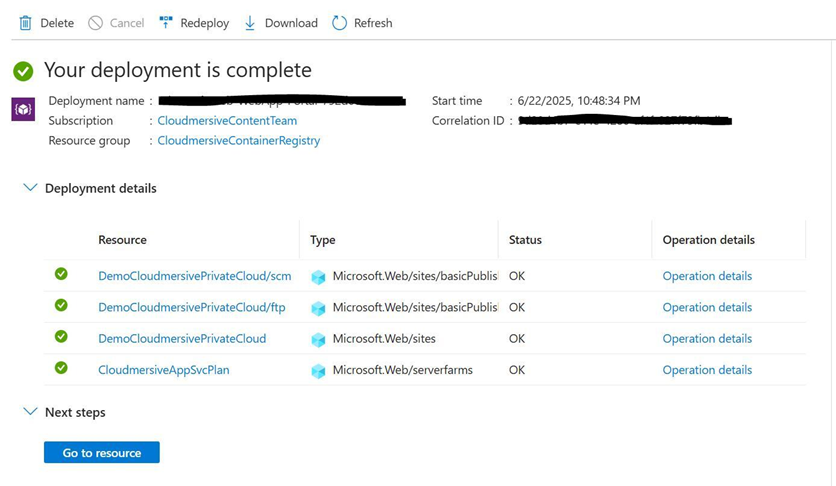
When our deployment is successful, we can move onto the final steps of our installation process.
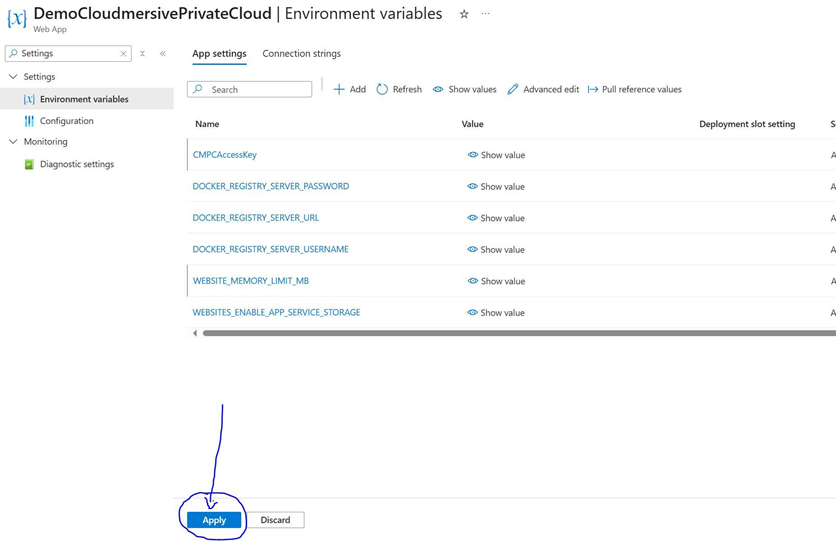
Configuring Environment Variables
We’ll now click “Go to resource” to navigate to our app page. From there, we’ll head to our app settings, and we’ll select environment variables.
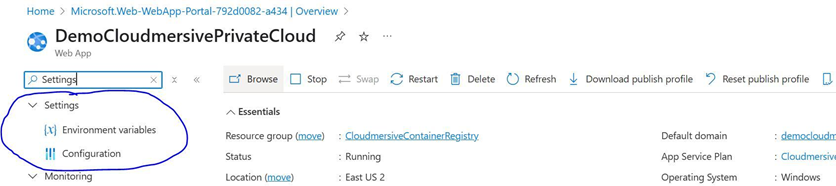
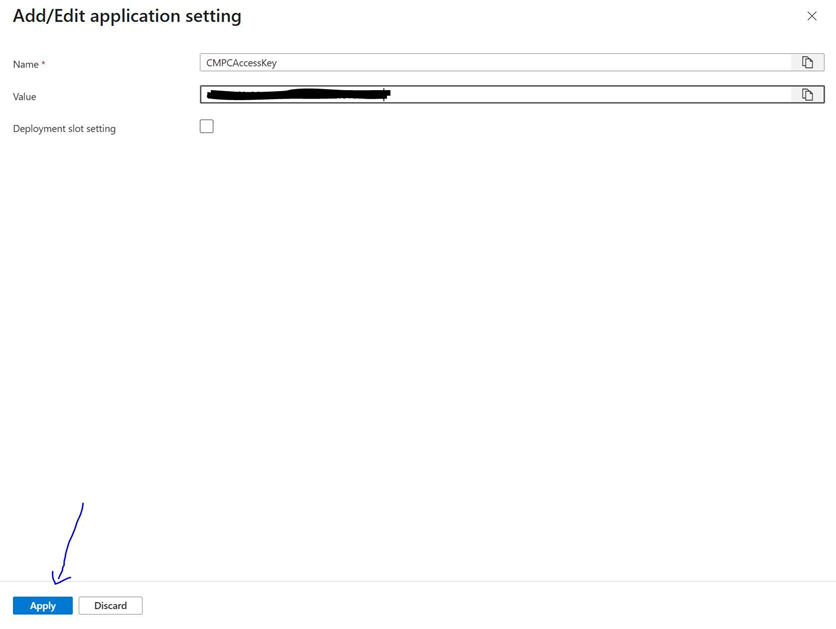
We’re going to create two environment variables for our web app: one for our CMPAccessKey, and one for our website memory limit.
To create our first variable, we’ll click on the add variable button.

We’ll name our variable CMPCAccessKey, and we’ll give it the value shown in our Private Cloud Azure App Services installation walkthrough (in step 3, part 2). We’ll then click apply.
(
Next, we’ll click add once again, and this time we’ll name our variable WEBSITE_MEMORY_LIMIT_MB. We’ll set the value to 15360, and we'll click apply once again.
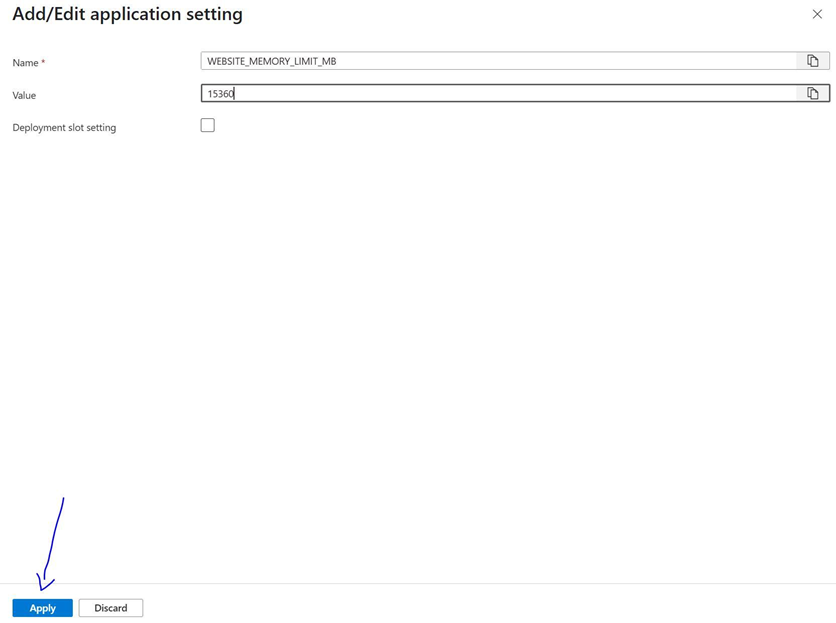
We’ll then click apply to save our new variables for our web app.
Configuring our Healthcheck
To wrap up, we’ll enable a healthcheck. We’ll find the healthcheck option in our app overview.
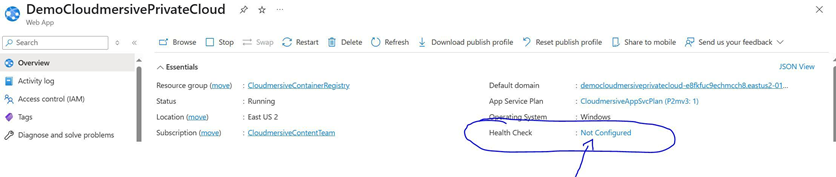
We’ll click on not configured, and we’ll check the option to enable a health check. Finally, we’ll set our path to /virus/status.
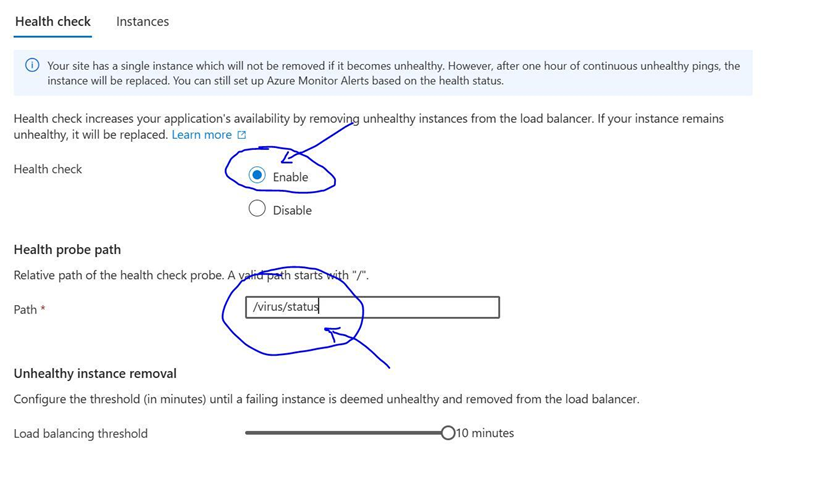
Once we save our healthcheck configuration, Cloudmersive Private Cloud will officially begin deploying.
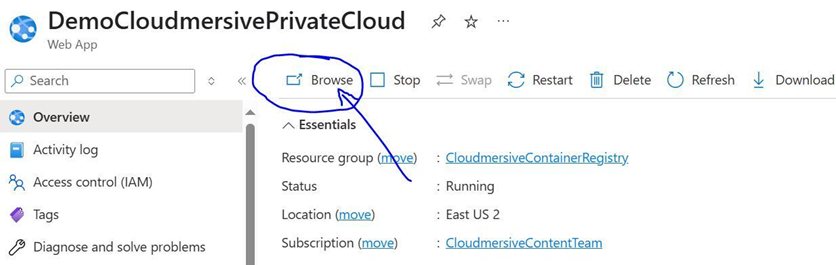
Confirming a Successful Deployment
Deployment may take up to 15 minutes to complete. To check on the status of our deployment, we’ll head back to our app overview and click on browse.
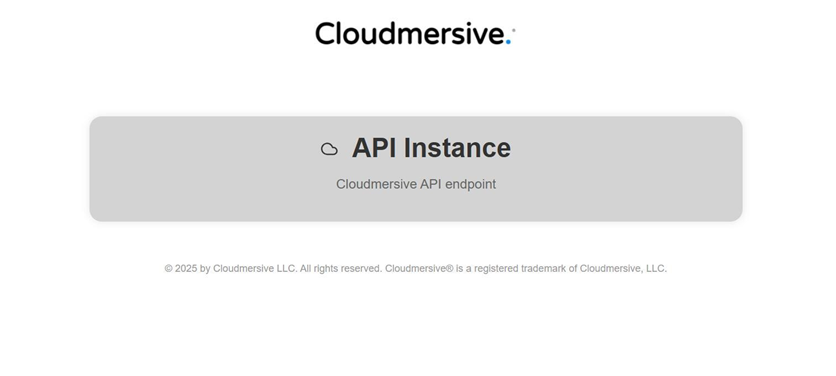
We’ll refresh our app page until we see the Cloudmersive Private Cloud logo appear. At this point, our deployment is complete and we can begin using it!
Final Thoughts
If you have any questions for our team after following along with this walkthrough, please feel free to contact your account manager or any member of our support team. They’ll be more than happy to assist you.


 Blog
Blog Virus Scan APIs
 Content Disarm and Reconstruction APIs
 Spam Detection APIs
 Document Conversion & Processing APIs
 Document AI APIs
 Natural Language Processing (NLP) APIs
 Optical Character Recognition (OCR) APIs
 Image and Face Recognition and Processing APIs